* upgrade to latest pip for in_docker_test_script.sh * Bump gunicorn to 22.0.0 (security) Changelog: https://docs.gunicorn.org/en/stable/news.html#id1 use utime to notify workers liveness migrate setup to pyproject.toml fix numerous security vulnerabilities in HTTP parser (closing some request smuggling vectors) parsing additional requests is no longer attempted past unsupported request framing on HTTP versions < 1.1 support for chunked transfer is refused (only used in exploits) requests conflicting configured or passed SCRIPT_NAME now produce a verbose error Trailer fields are no longer inspected for headers indicating secure scheme support Python 3.12 ** Breaking changes ** minimum version is Python 3.7 the limitations on valid characters in the HTTP method have been bounded to Internet Standards requests specifying unsupported transfer coding (order) are refused by default (rare) HTTP methods are no longer casefolded by default (IANA method registry contains none affected) HTTP methods containing the number sign (#) are no longer accepted by default (rare) HTTP versions < 1.0 or >= 2.0 are no longer accepted by default (rare, only HTTP/1.1 is supported) HTTP versions consisting of multiple digits or containing a prefix/suffix are no longer accepted HTTP header field names Gunicorn cannot safely map to variables are silently dropped, as in other software HTTP headers with empty field name are refused by default (no legitimate use cases, used in exploits) requests with both Transfer-Encoding and Content-Length are refused by default (such a message might indicate an attempt to perform request smuggling) empty transfer codings are no longer permitted (reportedly seen with really old & broken proxies) ** SECURITY ** fix CVE-2024-1135 * Remove TYPE_CHECKING guard for pydantic v1 imports Retain TYPE_CHECKING guard in v1 fallback to force pyright into pydantic.v1 namespace * Run unit tests with pydantic v1 now that v2 is installed via poetry |
||
|---|---|---|
| .devcontainer | ||
| .github | ||
| benchmarks | ||
| docker-example | ||
| docs | ||
| integration | ||
| reflex | ||
| scripts | ||
| tests | ||
| .coveragerc | ||
| .gitignore | ||
| .pre-commit-config.yaml | ||
| CODE_OF_CONDUCT.md | ||
| CONTRIBUTING.md | ||
| LICENSE | ||
| poetry.lock | ||
| pyproject.toml | ||
| README.md | ||
| SECURITY.md | ||
+ Searching for Pynecone? You are in the right repo. Pynecone has been renamed to Reflex. +


✨ Performant, customizable web apps in pure Python. Deploy in seconds. ✨
![]()
![]()


English | 简体中文 | 繁體中文 | Türkçe | हिंदी | Português (Brasil) | Italiano | Español | 한국어 | 日本語
Reflex
Reflex is a library to build full-stack web apps in pure Python.
Key features:
- Pure Python - Write your app's frontend and backend all in Python, no need to learn Javascript.
- Full Flexibility - Reflex is easy to get started with, but can also scale to complex apps.
- Deploy Instantly - After building, deploy your app with a single command or host it on your own server.
See our architecture page to learn how Reflex works under the hood.
⚙️ Installation
Open a terminal and run (Requires Python 3.8+):
pip install reflex
🥳 Create your first app
Installing reflex also installs the reflex command line tool.
Test that the install was successful by creating a new project. (Replace my_app_name with your project name):
mkdir my_app_name
cd my_app_name
reflex init
This command initializes a template app in your new directory.
You can run this app in development mode:
reflex run
You should see your app running at http://localhost:3000.
Now you can modify the source code in my_app_name/my_app_name.py. Reflex has fast refreshes so you can see your changes instantly when you save your code.
🫧 Example App
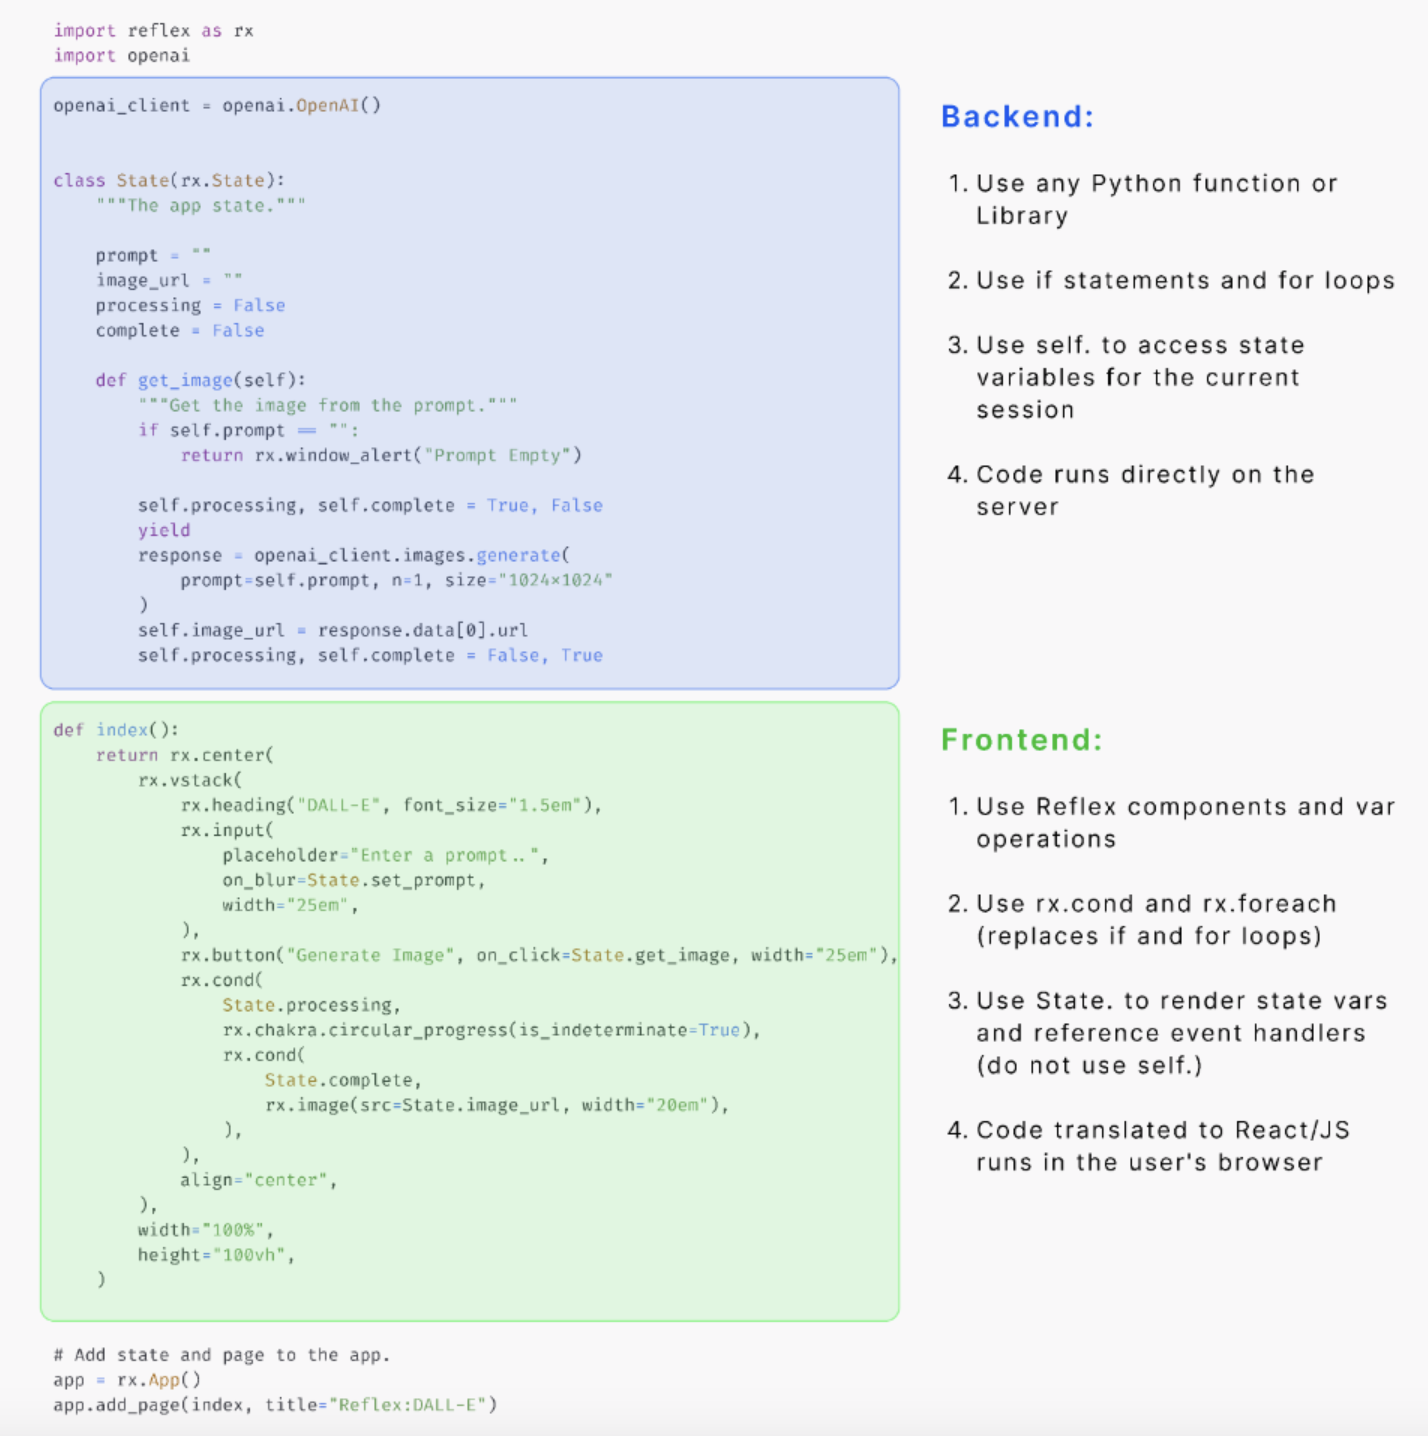
Let's go over an example: creating an image generation UI around DALL·E. For simplicity, we just call the OpenAI API, but you could replace this with an ML model run locally.
Here is the complete code to create this. This is all done in one Python file!
import reflex as rx
import openai

openai_client = openai.OpenAI()


class State(rx.State):
    """The app state."""

    prompt = ""
    image_url = ""
    processing = False
    complete = False

    def get_image(self):
        """Get the image from the prompt."""
        if self.prompt == "":
            return rx.window_alert("Prompt Empty")

        self.processing, self.complete = True, False
        yield
        response = openai_client.images.generate(
            prompt=self.prompt, n=1, size="1024x1024"
        )
        self.image_url = response.data[0].url
        self.processing, self.complete = False, True


def index():
    return rx.center(
        rx.vstack(
            rx.heading("DALL-E", font_size="1.5em"),
            rx.input(
                placeholder="Enter a prompt..",
                on_blur=State.set_prompt,
                width="25em",
            ),
            rx.button("Generate Image", on_click=State.get_image, width="25em"),
            rx.cond(
                State.processing,
                rx.chakra.circular_progress(is_indeterminate=True),
                rx.cond(
                    State.complete,
                    rx.image(src=State.image_url, width="20em"),
                ),
            ),
            align="center",
        ),
        width="100%",
        height="100vh",
    )

# Add state and page to the app.
app = rx.App()
app.add_page(index, title="Reflex:DALL-E")
Let's break this down.
Reflex UI
Let's start with the UI.
def index():
    return rx.center(
        ...
    )
This index function defines the frontend of the app.
We use different components such as center, vstack, input, and button to build the frontend. Components can be nested within each other
to create complex layouts. And you can use keyword args to style them with the full power of CSS.
Reflex comes with 60+ built-in components to help you get started. We are actively adding more components, and it's easy to create your own components.
State
Reflex represents your UI as a function of your state.
class State(rx.State):
    """The app state."""
    prompt = ""
    image_url = ""
    processing = False
    complete = False
The state defines all the variables (called vars) in an app that can change and the functions that change them.
Here the state is comprised of a prompt and image_url. There are also the booleans processing and complete to indicate when to show the circular progress and image.
Event Handlers
def get_image(self):
    """Get the image from the prompt."""
    if self.prompt == "":
        return rx.window_alert("Prompt Empty")

    self.processing, self.complete = True, False
    yield
    response = openai_client.images.generate(
        prompt=self.prompt, n=1, size="1024x1024"
    )
    self.image_url = response.data[0].url
    self.processing, self.complete = False, True
Within the state, we define functions called event handlers that change the state vars. Event handlers are the way that we can modify the state in Reflex. They can be called in response to user actions, such as clicking a button or typing in a text box. These actions are called events.
Our DALL·E. app has an event handler, get_image to which get this image from the OpenAI API. Using yield in the middle of an event handler will cause the UI to update. Otherwise the UI will update at the end of the event handler.
Routing
Finally, we define our app.
app = rx.App()
We add a page from the root of the app to the index component. We also add a title that will show up in the page preview/browser tab.
app.add_page(index, title="DALL-E")
You can create a multi-page app by adding more pages.
📑 Resources
📑 Docs | 🗞️ Blog | 📱 Component Library | 🖼️ Gallery | 🛸 Deployment
✅ Status
Reflex launched in December 2022 with the name Pynecone.
As of February 2024, our hosting service is in alpha! During this time anyone can deploy their apps for free. See our roadmap to see what's planned.
Reflex has new releases and features coming every week! Make sure to ⭐ star and 👀 watch this repository to stay up to date.
Contributing
We welcome contributions of any size! Below are some good ways to get started in the Reflex community.
- Join Our Discord: Our Discord is the best place to get help on your Reflex project and to discuss how you can contribute.
- GitHub Discussions: A great way to talk about features you want added or things that are confusing/need clarification.
- GitHub Issues: Issues are an excellent way to report bugs. Additionally, you can try and solve an existing issue and submit a PR.
We are actively looking for contributors, no matter your skill level or experience. To contribute check out CONTIBUTING.md
All Thanks To Our Contributors:
License
Reflex is open-source and licensed under the Apache License 2.0.